Composting Made Simple
If you’re into gardening, you’ve probably heard rave reviews about compost. That glowing admiration is well deserved. Over the years, compost has earned a reputation as the “black gold” of soil amendments. And the reason is simple. Composting is an eco-friendly practice that reduces landfill, saves you money and delivers much-needed nutrients to supercharge plant growth. If you’re ready to learn how to compost, here are 6 simple steps to get you started.
Step 1: Establish a compost site. While numerous companies sell fancy compost bins, all you really need is a flat stretch of ground. Because your compost needs to stay moist, you may want to pick a place in the shade. Try to find an area that is at least three feet in diameter. An area of this size can facilitate the internal temperatures necessary for the decomposition of organic materials. If you have a large amount of material to compost, pick a larger area or establish multiple piles.
Step 2: Gather your materials. Wondering what to compost? You’ll need carbon-rich materials like leaves, shredded paper, straw, and pine needles. These are often referred to as “brown materials.” You’ll also need nitrogen-rich matter like grass clippings, vegetable scraps, fruit rinds, and horse or cattle manure. You may hear these referred to as “green materials.” Regardless of their actual color, you’ll want to mix these two types of materials to fuel the beneficial microorganisms that decompose your compost pile. That’s composting 101.
(Note: When you’re learning how to compost, DO NOT add meat scraps or pet waste from carnivorous animals like dogs or cats. While it’s possible to compost meat products and animal waste, the process produces unpleasant smells, attracts biting flies and draws scavengers like raccoons, possums, coyotes, and even bears. For composting meat products, you’ll need a special, airtight bin that traps in smells and keeps out pests.)
Step 3: Layer your materials. How to start composting is a pretty straightforward affair — start with a thick bed of brown matter like leaves. This creates an effective drainage mechanism to keep excess water from building up. Next, layer or mix in successive additions of brown and green materials. Shoot for a ratio of 3 parts brown matter to one part green matter. If you end up with a more even ratio (something like 50-50), don’t worry. Nature will take its course, yielding rich organic material for your garden.
Step 4: Stir it up. Turn your pile over every week or two. You can expedite the process by shoveling the pile into an empty, adjacent space. Try to mix it up well, moving decaying materials from the top to the bottom and vice versa. You’ll also want to move outside layers toward the middle of the pile. Don’t worry. It’s not an exact science. As long as you shuffle the compost around nicely, you’ll continue to see it decompose into that highly sought-after black gold.
Step 5: Water as needed. Just like houseplants, it’s possible to overwater your compost. Too much water can drown out beneficial microorganisms and leach valuable nutrients into nearby soil. But moisture is absolutely necessary to the composting process. If your compost pile is looking parched, water it once every week or two.
Step 6: Cash in on that black gold! Your pile will finish composting somewhere between one and five months. It all depends on moisture levels, how often it’s turned, and the sheer size of decomposing materials. Bigger materials like sticks and branches take much longer to compost, so shred your materials to the smallest size you reasonably can. This is an important consideration when you’re thinking about what to compost.
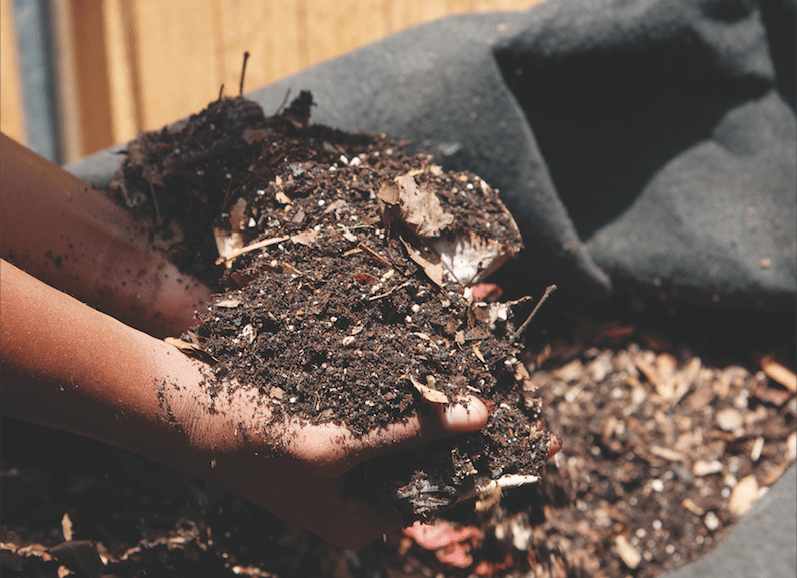
When your pile is finished, it should have a rich, organic smell and deep, black color. Once your compost hits this stage, you can use it as potting mix, amend your garden soil with it, or use it as a nutritious top cover in your garden. The result will be healthier, more vibrant plants and larger yields on your vegetable crops. Now that you know how to compost, get out there and start layering your materials. When you see the results in your garden, you’ll know why it’s such a popular pastime!
No need for worms?
I recently emptied my Smart Pot Compost Sack, and there was quite a bit of activity in there; pill bugs, centipedes, couple of big spiders and yep, some worms. The finished compost was beautiful, looked like potting soil with some sticks thrown in.